


Klunk
-
Posts
735 -
Joined
-
Last visited
Content Type
Profiles
Forums
Blogs
Events
Blatmaps
Speed Championship Results
News
Website Help
Downloads
Gallery
Store
Posts posted by Klunk
-
-
Hi Anthony, I’ll take this. Will contact sm25T now
-
Hi Dom,
I'll have the half hood please
Cheers,
Giles
-
Hi - pm sent re. draft reducer and bag.
Giles
-
Hi,
Can I take the long nose shower cap please.
Giles
-
Hi, PM sent.
Regards,
Giles
-
Hi Ian,
Thanks - will definitely take both. PM sent.
Giles
-
Hi Ian,
I will have if still available. Have PM'd
Regards,
Giles
-
Set of barely used winter wheels & tyres from a 2011 BMW 5 series Touring.
Wheels are in very good condition. Tyres are Dunlop Wintersport 3D 225/55R17 Runflats in good condition and with loads of tread.

£450 - collection only
Cheers,
Giles
-
Regrettably I have had to pass, so still available.
Regards,
Giles
-
Hi Paul,
Very interested, assuming it will fit!
I have sent Phillip a text.
Regards,
Giles
-
Radiator fan switch. Normally M22 x 1.5 thread if I remember correctly.
The temperature range should be on it somewhere e.g. 85-92
Regards,
Giles
-
Hi,
I'll take them if they're still available. Blatmail me your number and i'll give you a ring to arrange payment etc.
Regards,
Giles
-
Nick,
Oil take off point is as Nigel says, however you may need an adapter for the sender as the Zetec block take off points are metric.
Regarding the water temp senders, the larger top one is the ECU sensor. The smaller lower one is the gauge sender.
Regards,
Giles
-
-
Just picking up on the different exhaust header temps, check the air flow balance between your carbs.
Regards,
Giles
-
Hi Rj,
No, definitely DeDion to English Axle. The lower rear bulkhead chassis rail is different hence the different rear bulkhead panel.
Probably got some pictures somewhere, but it might take me a while to find them!
Regards,
Giles
-
You'll be able to tell by the chassis bracing on the rear bulkhead and it's associated aluminium panel.
My first Caterham was the same age and had had Dedion to English axle conversion done when the diff bracing broke, which was common on early cars due to the thinner gauge tubing. The rear bulkhead 'A' was replaced/modified but it was only just noticible. I found out when I was at Arch replacing the rear bulkhead panel.
Regards,
Giles
-
Apologies if obvious, but, the width of the wheel will affect the offset you require/can fit. Not so much of a problem if running 6" all round, but definitely an issue with eg 6" fronts and 8.5" rears.
Also, worth noting changes to the front wheel will alter the scrub angle and affect the handling (although, probably not that critical if not driving on the ragged edge).
Regards,
Giles
-
-
Hi Terry,
For pump travel watch
from 7min40s. Pump travel considerably more than you're getting!Regards,
Giles
-
Hi Nigel,
General consensus from the web appears to be 1/4NPT. For confirmation have a look at the ThinkAuto catalogue.
Regards, Giles
-
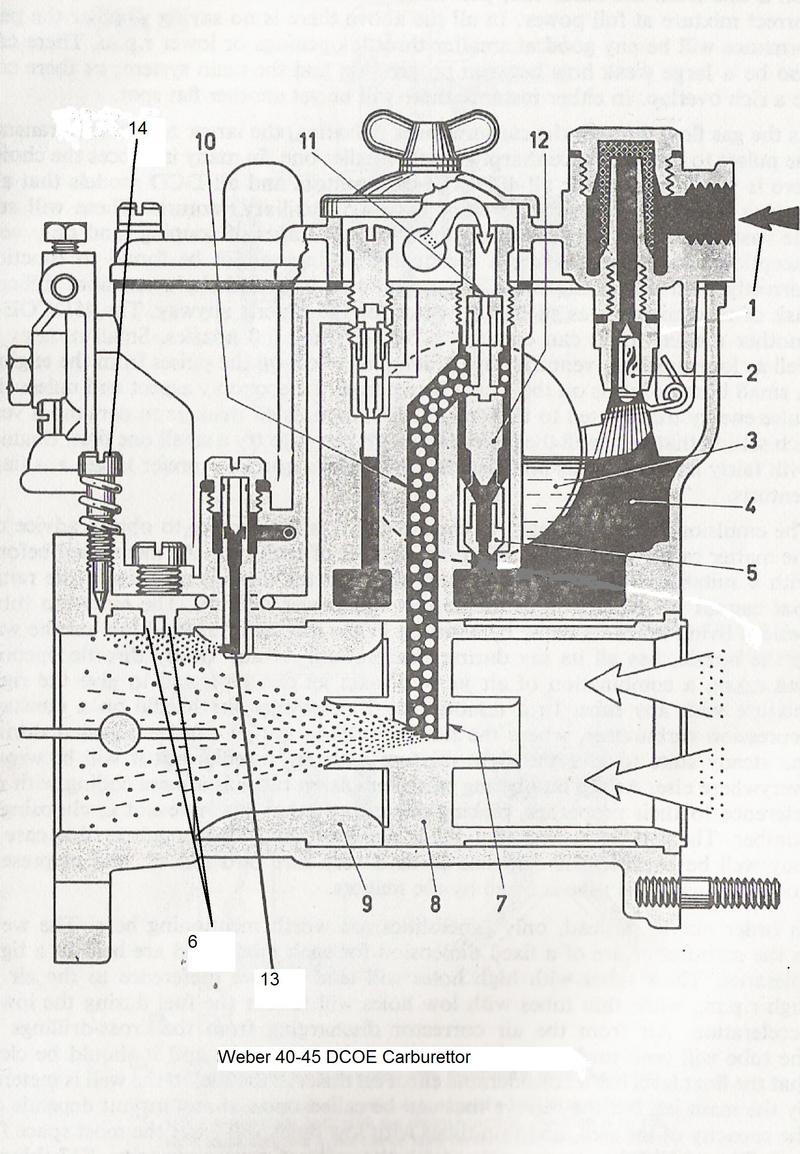
I beg to differ Oliver. The pump jets are just in front of the butterflies, and depending on the size of your chokes, visible. Pump jet is No. 13 here
I do, however, agree that it is unlikely that these are the issue.
-
Fitted quite a few now. Off the top of my head and in no particular order:
- Get the car a decent distance off the ground. Allow a few extra inches so you can still get under when the new floor is in place.
- If you can get hold of air riveter it will save your hands.
- Cleco pins are a necessity if you're doing this on your own.
- Be prepared to spend some time finding the best position for the floor. Depending on whether it's metric or imperial this varies as the floors are all the same but the chassis aren't. You may have to 'gently' fettle the floor sides to give a good fit.
- Some people drill new holes on the tunnel side chassis rail. However, it is fairly easy to reuse the existing holes. It just takes a little bit longer.
- Use good quality drill bits to remove rivets (4mm). Have spare ones!
- If rivets spin when trying to drill them out, chisel them off (do not do this on the outer side skin).
- Squirt Waxoil into the chassis holes to 'trap' old rivet ends
- Use silicone sealant between the panel and the chassis rails.
- Make sure you have enough rivets for both the underside and the internal side and back panels.
- Fill any gaps around holes, and between the outer side rail and floor, with Tiger seal to waterproof.
- You need to put part of the old floor back between the outer side skin and chassis. You will need trim this off the floor using some snips.
- Make sure the floor is level. Use the formed support bracket to help do this
- Do not assume the holes in the base of the floor are in the right position for the seat bolts. This is awkward in the S3 but should be easier in the SV. Leathers are easier than Tillets
- For best results take your time
Difficult to explain everything here, but if you have any questions i'd be happy to answer them over the phone.
Regards,
Giles
-
To check if the pump jets are working, remove the air filter. Looking down the trumpets to the butterfly plates (torch may be required), open the throttle quickly a few times by hand then let it shut. You should see the butterflies get wet and a pool of fuel at the bottom near the bottom of each butterfly.


Engine Cutting Out Intermittently
in TechTalk
Posted
In addition to the above, do you have an FIA switch? Intermittent cut out can be a sign of it starting to fail.
Giles