


rkeywood
-
Posts
272 -
Joined
-
Last visited
-
Days Won
1
Content Type
Profiles
Forums
Blogs
Events
Blatmaps
Speed Championship Results
News
Website Help
Downloads
Gallery
Store
Posts posted by rkeywood
-
-
I run 265lb front and 90lb rear on a track biased car but it's OK on the road. Generally you can increase the fronts a lot but less so on the rear without losing traction, it really depends what you're looking for and how far you want to go. The older Caterham springs (as yours I think) are too soft and the original dampers were awful. The springs were, I think, stiffer on the replacement (Bilstien?) dampers and the rear springs progressive rate. Something like 125 to 150 front and 75 rear might be a decent starting point if you just want to firm it up a bit for the road.
A change in springs probably needs to go hand in hand with a look at the dampers, unless already running later ones. Also the additional top link on the front suspension really needs adding, if not already fitted, with stiffer fronts. Worth having a chat with Matt at ProComp Motorsport, either just about springs or spring/damper options. Whilst they mainly do track work they're a real help on live axle road cars.
-
Check the neck size/thread and try Merlin Motorsport. They do knurled spares for their tanks which might just be the same
-
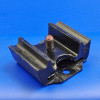
Looks like a 105E mount - see if this is it and the dim's match up

-
As you say, looks like a 7T. Here’s the speedo drive list for the 3 & 4 rail Ford boxes with 13” wheels if it helps in any way. What diff and wheels/tyres are you using?

-
IIRC they were Gates hoses at one point. Might be worth contacting them - the contact form on their website usually gets a quick response. TBH as the Redline hoses are only around £25 it’s best just to get one them. The Caterham red silicone hoses at about £40 are good and not that expensive. The black and blue are more for some odd reason.
-
Glad that’s helped identify the issue. You should be able to get a new one - try the classic ford (escort, capri etc) specialists and gearbox rebuilders. AFAIK the type 9 and earlier boxes use the same drive so more options when you Google. There’s a German guy on Ebay selling metal shaft remakes - I’ve no experience but worth a punt.
-
The instructions I had when I got mine (1991?) were to cut a 1" hole. Working off the bracket and mounting holes in the chassis you can mark the centre of the bit that comes through the skin on the inside, drill a pilot from the inside, then use a conduit box cutter for the hole from the outside. You can also flip the brackets L to R, temporarily bolt them in facing inwards and use them as a guide for the hole position and a final check before drilling
-
I'll pop mine in the post mine for you to try. The shaft measures 0.311". I've an old paper with the oil seal dims listed as 5/16" X 0.635" X 0.27".
-
I can't recall any of the Type E box drives being brown so could be a Type 9 which, I think, are interchangeable. Needs a tooth count on both the gear and pinion to see where you are with your diff / tyre combination.
The original Caterham selections for the Ital diffs above assume a 7 tooth pinion and 13" 185/70 tyres
The spare I have is a 25T and happy for you to borrow it to check the oil seal - message me with your address if you want to do that.
Here's the original Ford schedule for the various drive combinations if it helps
-
I've not had a problem with the Burton supplied oil seals but the speedo drive gear can be a problem. Is yours the original plastic one? If it needs replacing they can be hard to find new or secondhand. Steel ones used to be available from Burton (and others) but don't think they are any longer. I think I've a spare original type but not sure many teeth it has. What's yours? The regular Ital axle/diff drive gears are:
3.64 22T original Ford pt no 1546878 White
3.89 24T 6011062 Green
4.11 25T 1546879 Blue
I think there's a 23T (Black?) as well which is used with one of the Ford diffs. The pinion gear can also be changed (6, 7 or 8 tooth) so you can get some odd combinations where people have juggled with the gears to an accurate reading with different diff and tyre combinations.
-
This might help:
Rob Morley at Protune Racing is the go to for VTA info - he was, I think, the main engine man at Vegantune
-
Try speaking with PowerTrack.
Robert
-
I'm not sure about 'calibration', the tricky bit is setting the orientation of the float arm and angle of the float so it sits in the slope at bottom part of the tank. Once you've done that you can adjust the float arm length (and pivot height, if that type of sender), so there's correct travel from bottom to top. If you do it in situ with liquid then you end up chasing your tail - you get the bottom set, then the top is out, or you hit the baffle etc. Doing this in a mock up where you can see things is a 5 minute job. A lot of the older installs just had the travel set at the mid point height of the tank with the float arm parallel to the long side of the tank and left it at that. As a quick improvement, and starting point for trial and error, you can bend the float arm to angle it forward so the float almost touches the front of the tank, tweek the angle of the float on the arm so it's the same as the slope on the tank and increase the travel for the height at that point. The Caerbont and some of the universals need soldering once set and cut making adjust after more of a pain
-
After several attempts to make the original VDO sender in my car read accurately by trial and error I went for the Blue Peter solution - make a section of tank out of corrugated card (actually correx) and set it up off the car. To get the warning level I've just put a gallon in and dipped with the sender out to find the level (I've probably got this written down somewhere). I've done this subsequently with a generic vertical rod and float arm type and a top pivot type and it all makes sense when you can see it! You'll probably need to twist the float and, depending on the type, you may need to bend the arm or rotate the sender on it's mounting - the Caerbont (Smiths Classic) universal, for example, works best rotated one screw hole.
-
OK, BM your address and I’ll sort it
Rob
-
Those are what they supplied when I got my kit in '89 - I think it must have been lucky dip from Caterham stock or kit buyers got old stock! This photo was shortly after build.
If interested then how does £20 the pair plus delivery sound?
Rob
-
Hi
I've a pair that came off my '89 car many moons ago. Should clean up to near new - looks like one is missing a screw and foam pad (glass to base) but only a PK and easy fix
Rob
-
That’s homemade, bent from a bit of stainless sheet.
-
On 09/11/2023 at 12:31, Lizzybus said:
I will look , but its quite a "meaty" bracket to fit .
This is what I did to save drilling larger fixings
-
On 09/11/2023 at 08:40, JP said:
Sadly, this has happened and it seems that it's not repairable. I don't fancy ~£900 for a new full hood...
I wouldn't give up on repair, I've had old soft tops that were worse than that done. I'd have thought you could get a new window put in - the last one I had done (non 7) was a little over £100.
-
The Demon Tweaks guide here
https://blog.demon-tweeks.com/motorsport/plumbing-a-fuel-system-what-you-need-to-know/
covers most things with links to the relevant products
-
 1
1
-
-
40 minutes ago, Beagler said:
Had mine recently in Northampton Motor Sport. On jam and bread now and not sure can afford jam 🤣
Good news! We’re small scale jam, pickle and chutney makers and artisan bread and cake bakers. If any destitute 7 owners are in the Snetterton area they’re welcome to call by for freebies😀
-
You’re right, I hadn’t noticed that Esso had changed. It was when I last got 20l but that seems to be it. Millers EPS for garden tools from now on.
-
3 hours ago, 7 wonders of the world said:
Anthony, yo need to upgrade your fule hose, R6 is not compatible with Ethabol and deterriorates radpidly, you need R14, couple of metres will replace all the hose including the rear sections too

Or use Esso super (bio free). If the carbs haven’t had a service kit it the last few years they may not be bio friendly either.


Live axle oil seals
in TechTalk
Posted
Hi
Ital is GHS 184 - GHS 111 is Marina (-78?)
Ital pinion seal is DAM 5079